Sunday, February 24, 2013

And a puzzle it was . . .

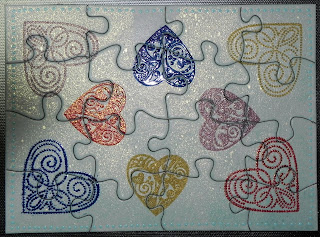
Our granddaughter loves to jigsaw puzzle and this week it will be her third birthday.  I decided to make her a puzzle card for her birthday and that by itself was a puzzle.  First of all for her to be able to take the card apart you have to stamp all the images on it and you can not use embellishments or stickers where pieces overlap.  Well I started out with a blank puzzle card.

My first thoughts were to make a sky and grass and kind of make a rain scene with rubber boots and an umbrella.  Raindrops, clouds and such.  So I first put a layer of gesso on the blank card.  After I used distress ink to make the sky and grass area I stamped some clouds with Versamark and white embossed them.  Like the card below.

Now for the boots and umbrella.  Of course I had a scratch piece of paper as well and I just was not happy with how it turned out.  I tried to stamp some animals on it did not make me happy either.  Then I tried pin-wheels.   Again I was not happy.  I finally decided that my grass, sky and clouds puzzle card was not it.  I will have to use it some other time. 

Next I just made the background one colour with distress ink and added some glimmer mist to it to give it some shine.  I decided to use shapes placed randomly on the card that would be more appropriate for a 3 year old I thought.  Well the shapes became hearts and they certainly were not randomly placed.  But I did like the end result.  I stamped the hearts with Versamark and embossed them with different colours embossing powder.  
 I was happy but I still did not feel it was finished.  Something was missing!  That is when I decided to put a dotted edge around the outside.  It finished the card.  I was now satisfied and I am sure our 3 year old granddaughter will have no problems putting this puzzle together.

This is a close up of one of the corners showing the dotted edge around it as well.

The puzzle card became a puzzle for me.

Supplies used:
SU Heart stamp, Michael Strong Heart stamp. Chinese red, blue, ochre and rose embossing powders.  Pearl shimmer mist. Distress inks.  Sakura gel pen. Puzzle card.


Tuesday, February 19, 2013

Glitter! Glitter! and more glitter.

This card has to be one of my favourites.  First I letter-pressed the background after following Stamp TV's video and really liked the outcome.  But how to finish it without covering up the background.  Well my idea came from Holly from TJ yahoogroups who posted this 'glittery peony' card on her blog.  It gave me the idea on how I wanted to finish my card.  Thank you Holly!


I used Tim Holtz distress ink for the background.  Memory Box dies for the butterfly which I covered with Tim Holtz distress glitter.  Please click on Holly's card to see how it is done.


A close-up of the butterfly to show the glitter.

This is a method I know I will use again and again.

Wednesday, February 13, 2013

Happy Valentine's Day!

I am not a Valentine's day person but I really wanted to try out this 'card with candy box' from Technique Junkies.  I think it will be a nice card to make and fill with Easter candy or something for the grand-kids   But I just could not figure it out from just the instructions so I had to try it out first.  It is actually quite simple once you know what you are doing. It is amazing how it all fits together to make a box with card attached.

 I choose yellow as the main colour as it is my husband's favourite colour.  I added an extra 'card' layer on top of the card part so it even opens up for a sentiment on the inside.  It was a difficult card to photograph but I hope you get the idea.


Monday, February 11, 2013

Finally done!!!

I started with a card for my granddaughter last week but just was not happy with what I was doing.  I finally saw a sample of a card I really liked so I changed my approach and made a totally new card.  The only thing I used from the old card was the scalloped circle with the number 8 on it.
The idea I got from Christina here.


Wednesday, February 6, 2013

Wax Paper Resist

For a challenge we worked with wax paper resist.  I made two backgrounds and the following card is one of them.  It is a birthday card for my son (turning 38 this year).
After I ironed on the 'wax paper resist' on white card stock I coloured it with distress stains, used a template and sprayed with a TH colour wash paint.  I then stamped the 'clock', with VersaMark, again on white card stock and used white embossing powder.  Again I used distress stains to colour in the background and gave it a spray of colour wash again.  I cut the saying with my Ecraft cutter from metallic silver paper.  The inside of the card says:  Happy Birthday!


Now I have to work on my granddaughter's BD card as her birthday is the day before her Dads.

Monday, February 4, 2013

February here we come!

Yes it is already the second month of the year.  Time does fly when you are having fun.
I promised myself I would make at least one (1) Christmas card every month.  Well January came and went without living up to this promise.  So I am starting early in February and try to make 2 Christmas cards this month.


and of course the close-up
I did make another card already for a challenge but won't be able to post it as yet but I will share it with you as soon as I can.
Up to the next card . . . .