Thursday, May 30, 2013

A quick update!

Just doing a quick update on my latest card and ATC.  I did make other cards but I will update these later.

I have been doing some work with Alcohol Inks and really enjoying playing around.  
For this card I used glossy card stock, alcohol inks with a touch of silver.  I stamped with Stays-On ink and cut the stamped image apart and glued it on black card stock.  Did the same for the HB saying.  I also stamped the envelope with stays-on ink.


Products used:  Glossy card stock, Stays-on Ink black and mustard.  Stamp: Hero -Blooming Meadow, Alcohol Inks: wild plum, cranberry and silver.  Blending solution. HB stamp - unknown.  Envelope: Stamp: Kicostamps - daisy.

Next I made an ATC with the left over piece of card stock.  I wanted to use a silver coloured dragonfly sticker but did not have one so I decided to add some gold colour alcohol ink so I could use the gold dragonfly.  The text is printed on a clear label, cut to size and put on top of the ATC.


Products used:  Stamp: Kicostamps - Flowers and Animals Place 46.  Dragonfly sticker. Alcohol inks:  wild plum, cranberry, silver, gold, terra cotta, butterscotch and stream.

I really like working with alcohol inks hope you enjoy the card and ATC.

Tuesday, March 26, 2013

Old art backgrounds renewed!

During my daily blogging I came across a blog which suggested using old art backgrounds as part of focal point on a card.  I made this background when I was still living in Calgary so it is an old background alright.


I was able to find a green card stock to match the green in the background piece so after matting on black and the green I really liked the results.  
This is a close up of the focal point matted.

Here another look at the card where you can see the embossing I did and I cut the Happy Birthday with my Ecutter.  
Really like the idea of using old art backgrounds I have made over time.

Supplies used:
SU brown, black and green cardstock.  Ecutter for text and shadow text. Sizzix TH embossing folder.

Sunday, March 17, 2013

Yes I did finish my coffee ATCs finally

I talked about the coffee background card and ATC earlier and I decided to make my ATCs in a set and actually it will be series as well.  This set is called Spring and as you can guess my next set will be Summer but not for a while and I will also be using a different technique.

I am really pleased with these so I am glad I did some more.
 
Up to my next set of cards or will it be ATCs again.  They are addicting.

Easter is coming . . .

I know Easter is a couple of weeks away yet but two of our grand kids are coming this weekend to visit and we won't see them before Easter so I had to get their Easter card ready early.

It is the same style box I made in February for Valentine's Day but with the Easter theme of course.  I have learned a few things making these boxes.  First of all you either use paper which has colour or a pattern on one side only or paste a piece of white (cream) paper on the 'card' part before you stamp, colour and decorate.  Coloured paper just does not show up as well and it does not do any justice to your work.  It does not photograph very well either.


I am sure you can tell that one is for a boy and one for a girl.  A fun card/box to make.

Wednesday, March 13, 2013

Using instant coffee to make a background!!!

Yes you are reading it right.  Instant coffee to make your background for a card, ATC or scrap page.  Sprinkle some instant coffee on some card stock (not too much), spritz it with water and let dry.  That is all you have to do.
I used plain card stock the first time I tried it but used too much coffee and was not happy with the result.   But I did make an ATC with it just to try it out.  My first ATC, they say they become addicting so who knows.
Liked the idea but did not like my handwriting and also the clock stamp.  It was a busy background already and it did not need more.

The cup is a Michael Strong stamp which I embossed en coloured in with distress ink.


Next is an ATC for which a used watercolour paper as the background.  Again I used coffee, just a little, spritzed it and let it dry.  Very important to let it air dry to remove any extra coffee after.  This time I did a bit of a theme and called it my Spring series.  Will have to show the rest later.

I used Perfect Pearls on the butterflies to give the card some 'bling'.  The Spring text was cut out with my Ecraft en the cattails stamp is from Our Daily Bread and the birds from De Stempelwinkel.


And now for my card.  Again watercolour paper background with the coffee.  Stamped flowers with  Antique Linen distress ink.  A ribbon and a saying and this all mounted on a chocolate coloured background card.


close up of the coffee 'stain' and the background stamping.
Stamps used are from Stampendous - Agapanthus Thank You, saying - Hero Arts.  Ribbon and brown paper???

Hope you enjoyed this coffee technique.  It was a challenge from Kicostamps - http://kicostamps.blogspot.nl/

Sunday, February 24, 2013

And a puzzle it was . . .

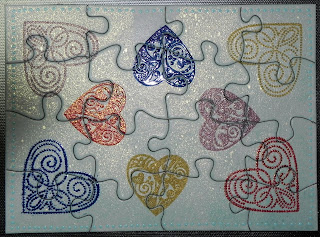
Our granddaughter loves to jigsaw puzzle and this week it will be her third birthday.  I decided to make her a puzzle card for her birthday and that by itself was a puzzle.  First of all for her to be able to take the card apart you have to stamp all the images on it and you can not use embellishments or stickers where pieces overlap.  Well I started out with a blank puzzle card.

My first thoughts were to make a sky and grass and kind of make a rain scene with rubber boots and an umbrella.  Raindrops, clouds and such.  So I first put a layer of gesso on the blank card.  After I used distress ink to make the sky and grass area I stamped some clouds with Versamark and white embossed them.  Like the card below.

Now for the boots and umbrella.  Of course I had a scratch piece of paper as well and I just was not happy with how it turned out.  I tried to stamp some animals on it did not make me happy either.  Then I tried pin-wheels.   Again I was not happy.  I finally decided that my grass, sky and clouds puzzle card was not it.  I will have to use it some other time. 

Next I just made the background one colour with distress ink and added some glimmer mist to it to give it some shine.  I decided to use shapes placed randomly on the card that would be more appropriate for a 3 year old I thought.  Well the shapes became hearts and they certainly were not randomly placed.  But I did like the end result.  I stamped the hearts with Versamark and embossed them with different colours embossing powder.  
 I was happy but I still did not feel it was finished.  Something was missing!  That is when I decided to put a dotted edge around the outside.  It finished the card.  I was now satisfied and I am sure our 3 year old granddaughter will have no problems putting this puzzle together.

This is a close up of one of the corners showing the dotted edge around it as well.

The puzzle card became a puzzle for me.

Supplies used:
SU Heart stamp, Michael Strong Heart stamp. Chinese red, blue, ochre and rose embossing powders.  Pearl shimmer mist. Distress inks.  Sakura gel pen. Puzzle card.


Tuesday, February 19, 2013

Glitter! Glitter! and more glitter.

This card has to be one of my favourites.  First I letter-pressed the background after following Stamp TV's video and really liked the outcome.  But how to finish it without covering up the background.  Well my idea came from Holly from TJ yahoogroups who posted this 'glittery peony' card on her blog.  It gave me the idea on how I wanted to finish my card.  Thank you Holly!


I used Tim Holtz distress ink for the background.  Memory Box dies for the butterfly which I covered with Tim Holtz distress glitter.  Please click on Holly's card to see how it is done.


A close-up of the butterfly to show the glitter.

This is a method I know I will use again and again.

Wednesday, February 13, 2013

Happy Valentine's Day!

I am not a Valentine's day person but I really wanted to try out this 'card with candy box' from Technique Junkies.  I think it will be a nice card to make and fill with Easter candy or something for the grand-kids   But I just could not figure it out from just the instructions so I had to try it out first.  It is actually quite simple once you know what you are doing. It is amazing how it all fits together to make a box with card attached.

 I choose yellow as the main colour as it is my husband's favourite colour.  I added an extra 'card' layer on top of the card part so it even opens up for a sentiment on the inside.  It was a difficult card to photograph but I hope you get the idea.


Monday, February 11, 2013

Finally done!!!

I started with a card for my granddaughter last week but just was not happy with what I was doing.  I finally saw a sample of a card I really liked so I changed my approach and made a totally new card.  The only thing I used from the old card was the scalloped circle with the number 8 on it.
The idea I got from Christina here.


Wednesday, February 6, 2013

Wax Paper Resist

For a challenge we worked with wax paper resist.  I made two backgrounds and the following card is one of them.  It is a birthday card for my son (turning 38 this year).
After I ironed on the 'wax paper resist' on white card stock I coloured it with distress stains, used a template and sprayed with a TH colour wash paint.  I then stamped the 'clock', with VersaMark, again on white card stock and used white embossing powder.  Again I used distress stains to colour in the background and gave it a spray of colour wash again.  I cut the saying with my Ecraft cutter from metallic silver paper.  The inside of the card says:  Happy Birthday!


Now I have to work on my granddaughter's BD card as her birthday is the day before her Dads.

Monday, February 4, 2013

February here we come!

Yes it is already the second month of the year.  Time does fly when you are having fun.
I promised myself I would make at least one (1) Christmas card every month.  Well January came and went without living up to this promise.  So I am starting early in February and try to make 2 Christmas cards this month.


and of course the close-up
I did make another card already for a challenge but won't be able to post it as yet but I will share it with you as soon as I can.
Up to the next card . . . .


Thursday, January 31, 2013

Triple Stamping

The other day I looked at a tutorial from Split Coast Stampers called Triple Stamping.  I really like the idea and tried it out today.

It is a fun technique and you should really try it.  I do recommend you mark which side goes with which side.  I did get confused once I mounted my pieces on the dark matting but I think I got them all matching up.


This will be it for the month of January.  I made a total of 11 cards.  Used at least 9 of my stamps or stamp sets, some punches, different inks, jewels, embossing powder, glitter, a rub-on and other embellishments.  I did not have to go out and buy anything so I am pretty proud of myself.

Wednesday, January 30, 2013

Butterfly! Butterfly! Butterfly!

Wonder why they call them butterflies!  Here is another one of my water stamping backgrounds.  This time I did not waterstamp the back ground but splattered some distress ink with a toothbrush.

I then VersaMark stamped it with my new KicoStamp butterfly, heat and stick embossed and then put on some fine gold glitter.  De-bossed part with a Darice embossing folder and used the Inspire Rub-On to finish the card.


and this is a close up.


Another tissue paper background card

I made enough of the tissue paper background to do more than one card and this is my second one.  My challenge here was colouring the daffodils and not having the ink of the stamp run.  I finally found on how to do this and this is the result.

After I took a picture of the card I did move the Happy Birthday saying down to almost on top of the lace.  This looked much better, it did not seem to be floating in the air any more.

And this is a close up of the daffodils.  I used stickles to bring on some bling.


Saturday, January 26, 2013

Tissue Paper Re-do.

 Today I worked on another card but mainly the background.  I got the idea from Inkstains.  It was fun today and I will certainly use it again.   I used TH distress stains as the ink and SU gold metallic ink to make the background.  The Cloisonne Hummingbird is Michael Strong stamp covered with SU heat and stick and glitter.


and a close up of the hummingbird.

Again I used two of my stamps. 

Friday, January 25, 2013

Another Water Stamp Card

When I made my background for the first water stamping card I made enough to do more than one card.  So today I decided to use another piece and stamp on it with water.  It did not work the same way as the first time and this may be because 1) the stamp was too detailed or 2) the paper had dried too much.  But I really did like the effect it gave so this is my end result.

I used the silk flowers from SU and coloured them with the same distress inks I used for the background.  Mounted on a black card and another nice card done.  Not only that I used another stamp out of my collection of stamps.

A New Technique

A new technique for me at least.   Water Stamping!!!


With this method you colour the background with several colours of dye ink.  After it is dry you use a background stamp dipped in water and stamp on the inked paper.  I love the result of this.  I also water stamped the sentiment 'card' making it so look like the stamp continues on both pieces of paper.  The tutorial on how to do this can be found on Splitcoaststampers.


On to my next card trying a technique I have never done before and . . . .  using another one of my stamps.

Sunday, January 20, 2013

Two more cards!!!

Well here are two more cards I made this week. One is for a challenge and the other one is a Thank You card.

This is a card where I first worked the background with colour wash inks and then sprayed it with Gesso.  

This is the inside of the card.  Same background but no Gesso this time.

This card is a Faux Bleach Technique.  Hard to see but I think it is because of the colours I used.


Sunday, January 6, 2013

I am on a roll . . .

or is it too early to say.  I just joined a challenge to use at least one stamp from every stamp set or single stamp I own.  I doubt that I will be able to use all of them this year but I will try to use a lot of them.
This would be my first try at it.  I did not only use a stamp but also a Spellbinder die, inks and a couple of  punches I own.
I got this idea from Bonnie Mountford's blog - http://bonniescreativeplace.blogspot.ca/

My butterflies are a bit bigger but I could not find any small ones in a hurry.   On to the next 'stamped' card.

Saturday, January 5, 2013

My first card of the year!

I joint a Hybrid Challenge on Design House Digital as I have so much paper and stuff that I just cannot do everything digital.  And I do feel that I like to make my cards the old fashion way but I may just do this hybrid stuff more in the future.


It is not the best picture but I also took the challenge of using Lightroom to process this photo.  I use a banner from Audrey Neal's tribal elements and printed Happy Birthday on it.  Next I used some design paper and printed the flowers from Karla Dudley's Taupa collection on it and then put it all together.  I sponged the butterflies and masked the banner.  A bit of baker's twine and done was the card.

Certainly not difficult and a good way to use up some of my paper and embellishments.

On to my next project.

Happy New Year!!!

Yes it has been a long time since I posted so now is as good a time as any.

First my Christmas cards I made for different people.  As you can see same style of cards for the first 4 and then I made a couple of different ones. Of course I made more than one of each card.


Now on to 2013.